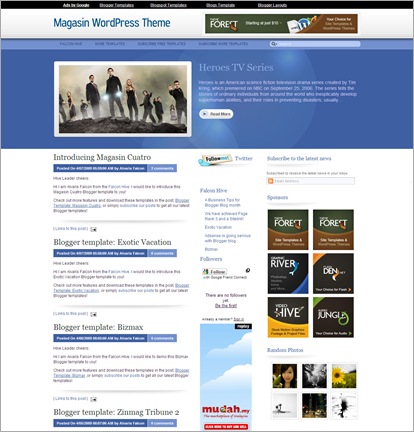
Rounded Blue

TURN OUT MAG is a Magazine style Blogger Template. This was originally a wordpress theme designed by ChiQ Montes and converted to Blogger by Bloggertricks. This template is new premium magazine templaes and released for free to all of you.

Equipped with 4 ads section and 1 featured content section for your product show-off, Magasin Cuatro is the professional magazine style template that suits your professional business identity. Discover this white elegant Blogger template and run your business with it!
Features included :

CODE: DOWNLOAD HERE
CODE: DOWNLOAD HERE
CODE: DOWNLOAD HERE
CODE: DOWNLOAD HERE
CODE: DOWNLOAD HERE
Welcome to Adsense Newbie Central, the complete resource center for newly approved AdSense publishers. Below you'll find everything you need to get started with AdSense, learn more about the program and advanced features, and maximize your AdSense experience. Follow the links for detailed instructions and troubleshooting tips.
Getting Started
___________________________________________________________________
Follow these steps below to get started with AdSense.
Your AdSense account consists of 4 tabs: Reports, AdSense Setup, My Account, and Resources. The last tab, Resources, is where you'll find links to all the official AdSense-related documentation, in one convenient location. If you ever lose track of your bookmarks, or just want to explore all the online resources AdSense has to offer, this tab is the place to start.
As for the other tabs, we'll explore them in detail below. (This is a good time to sign in to your account and walk through the account pages with us.)

The Reports tab lets you view detailed earnings reports, create custom reports, and get diagnostic information about your pages.

The AdSense Setup tab is where you get your AdSense code and manage product features such as color palettes, channels, filters, and site authentication.

The My Account section allows you to view and edit your Account Settings and Tax Information. The Payment History also shows your monthly earnings and payments.
Blogger navigation bar or simply called Blogger Navbar is a navigation and search bar locate on a top of all blogspot blogs. Eventhough they provide several useful features and different colors, sometimes it may not blend with your template. Some blogspot blogger hide the navbar as they feel that its less attractive . Most of the custom Blogger templates available on internet are also packed up after removing navbars . But removing navbar is a possible violation of Google Blogger TOS for ".blogspot " accounts and for those who have own domain in blogger , I hope there's no problem...Just follow a few step below to remove your navbar
- Log in to blogger
- On your Dashboard, select Layout. This will take you to the Template tab. Click Edit HTML. Under the Edit Template section you will see you blog's HTML.
- paste the CSS definition in the top of the template code:...
#navbar-iframe {
display: none !important;
}
/* Variable definitions
Remove the code to show it again
====================
...
Many people believe having an adsense ads inside blog posts is a very good thing to improve the performance of the ads.
As we know, there are more chances for the ads to be clicked when they are in the middle(blog posts) rather than at the sidebars(especially the right sidebar),footer,etc.
Adsense ads between post
By doing this, the adsense units will be displayed between the blog posts in the homepage, archive pages and permalink (individual post pages).
Follow the step below to do this:
1. Sign in to your blogger dashboard>click on the layout link
2. Click on the Edit link in the "Blog Posts' column[look at the below screenshot] 3. Check the box next to 'Show ads between Posts'
 4. Next,configure the ads,choose the format,colours,etc and SAVE THE CHANGES.
 That's it! Now your adsense ads will show between blog posts.
ShareCash is a next-generation upload site, where you get paid CASH for every download you get! Simply register, upload files, and let the cash start rolling in!![]()
What makes they different
Unlike other upload websites that give you pathetically low prices, such as $10 for 1000 US downloads, sharecash give you 30-60 cents PER DOWNLOAD! Thats $600 for 1000 US downloads - sixty times more than any other upload cash website!
Here are some assorted features:
Register now and within 30 seconds you'll be uploading files and making real cash in no time!
Register here
The full series of AdSense Tips is Part 1, Part 2, Part 3, Part 4, Part 5, Part 6, Part 7 and Part 8.
In general, there are many factors that impact the level of revenue generated from a blog using Adsense program. But I believe that four important elements which impact your Adsense earning capacity the most.
Here is a simple equation that illustrates how the factors each contribue to Adsense Revenue.
Each of the above elements contribue directly to the total revenue that you Adsense Ads will produce. You should work on all of them not just one of them though, because if any one is weak it will hold your potential earnings back. Lets break each factor down…
Traffic Levels: As I menetioned in the previous post of this serie, traffic levels is the most important factor. Simply the more people that see your Adsense Ads, the more likelihood there is that someone will click on them. Work on increasing your traffic levels and you should see an increase in your Adsense Revenue.
High Paying Ads: If the content you provide on your blog attracts high paying ads you’re going to do significantly better. For example if you’re blog is about technology (Basically advertisers are willing to pay top dollar to get their products and services out there) isn’t like it’s about ‘toothpicks’ - I suspect the ads are not likely to pay very much for such a topic.
Relevant Ads: Recently I visited a blog on Tourist destinations in Australia, but unfortunately they were getting ads for remote control cars, you can guess what their revenue was like. Increase the relevancy of your Ads to your content and you are one step closer to increasing your Adsense Revenue.
Optimally Positioned and Designed Ads: One of the greatest things about the Adsense program is that they allow you to choose the best position and color sheme for your ads. If your Adsense Ads are out of site they’ll never get clickedon. Just like in the wider world of advertising - positioning is a key element to an ads success.
The challenge comes to improving each of the four elements above to optimize Adsense Revenue.
In the next posts of the serie I’ll turn my attention to each of the four elements of good Adsense revenue in turn and give some practical easy to implement tips to improve each from my experience.
You keep reading all over the net about optimizing your Google Ads, and/or improving your revenue, but 90% of them tips never work.. Ok, you think that I wrote such a title just to get your attention to read my tips on here. Actually no, all what you have read on the title is correct. How to get upto $82 per click on Adsense!
One of the most important factor to improve your Adsense revenue is keywords targeting. So here I´m writing down a list of the top 500 highest paying Adsense keywords, that you can use on your page and hope that 1 of them get you lucky.
[It would take a big place to post the whole list here, so you can download the text file that contains the keywords below]
 Hai everyone..
Today's post is about Vince Tan with his new 'high quality' e-book; "Adsense BlackHat Edition. Before that, did you really know who is Vince Tan figure ??
This is my story: I am an engineering student who love blogging and I've learn what does it mean by 'BlackHat Thinking' during my subject of 'Thinking Skill'. BlackHat is just a method of how lawyer are thinking. Informative right.
So, what are you thinking about 'Adsense BlackHat Edition' with BlackHat Thinking' ?? Think yourself....
Back to our main topic
Vince Tan have told Gobalakrishnan about the strategy he use to make about $8000-$10000 a month with Google Adsense and they are about to become a partner to work with the much-feared and often misunderstood Black Hat school of Internet marketing. Maybe they would come out with another extended e-book.
So friends, what are you waiting for ?? Grab your free Adsense BlackHat Edition now and get what are people need for.
Here are some fast review about the ebook:
hi readers, Please note that all changes to your hold preferences should be made by the 15th of the month. Changes made to these settings after the 15th of the month may apply to either the current or next payment cycle.
Today, i want to show you how can you hold your adsense payment if any reason you would prefer not to receive your check at any time.
If you'd like to pause your payments, you may do so from within your publisher account. Setting a payment self-hold will stop payments until you update your preference and remove the hold. Your account will continue to accrue earnings, and you'll receive your single consolidated payment during the first payment cycle after you remove your hold. To modify your hold preference:
That's all for now. Thank you..(",)
1. Check your address
Since payments are sent to the mailing address submitted with your application, it's important to confirm the accuracy of your contact information and payee name. If you need to correct any information:
Log into your account at https://www.google.com/adsense
For security reasons, you cannot change the Payee Name or Country fields once your application has been approved. If you need to make changes to either of these fields, you need to contact Google and request to close your account. Once your request has been processed, you will then be able to submit a new application with the corrected payee name and mailing address.
2. Provide your tax information
In addition to confirming your contact information, you'll need to submit your tax information so that you may become eligible to receive a payment from Google. You can't get your payment unless you fill up the tax first. So don't skip this step!
If you haven't yet submitted your tax information, click the Tax Information link from the My Account tab. From this page, an easy-to-use wizard interface will help guide you to the appropriate online forms.
3. Select your form of payment
Depending on your payment address, there may be a number of payment options available to you — we suggest you read What forms of payment are available to me? in the AdSense Support center to learn about each option. Once you've decided how you'd like to be paid, click the Payment Information [edit] link from the My Account tab of your AdSense account. Follow the instructions on that page to select your form of payment. Your payments will be held until you have selected a form of payment.
4. Enter your PIN
Once you've earned $50 in combined AdSense for content and AdSense for search earnings, you will be mailed a Personal Identification Number to the payment address in your account. You'll need to enter this PIN into your account before you can get the payments. Your PIN will be sent by standard post and will take 2-3 weeks to arrive.
5. Generate $100 in earnings
When your total unpaid earnings reach $100, Google send you a payment at the end of the next month. For example, if your total unpaid earnings reached $100 during January and you completed the 4 steps above, you will get a payment at the end of February.
If your total unpaid earnings haven't yet reached $100, they'll roll over to the next month and accrue until they meet the $100 threshold.
Next, i will post about Payment Timelines or, "When am I paid?". Thank you...(",)Hi readers...
As you may know, one of the steps to receiving your first payment is to verify a Personal Identification Number (PIN). Google will send this PIN via standard postal mail once your earnings have reached $50, and then you'll need to enter it into the PIN Information Page of your account.
You need to enter in a PIN once per account, and Google will send it to you the first time you reach $50 in earnings.
If you've reached $50 in earnings and haven't yet entered in your PIN, you'll see a box at the top of your Payment History page labeled 'Required Action'. Click on the 'Please enter your PIN' link to review detailed information about the date your most recent PIN was generated, and when you can request a replacement should you need one. Once you've verified your PIN, you should no longer see this language on your Payment History page.
What will happen if I didn't verify my PIN ??
Google will mail your PIN to the payment address in your account. You'll then have 180 days to enter your PIN within your publisher account, or to request a replacement. If you do not enter your PIN within this period, your account will be disabled and your earnings refunded to the appropriate advertisers.
Google Adsense has now introduced a new payment form i.e. Western Union Quick Cash. Payments will be available for pick up at your local Western Union Agent the day after they are sent according to the normal payment schedule of Google Adsense. The countries where Quick Cash is possible are :
To change your payment form, login to your AdSense account, go to Account Settings under the My Account tab, then click the [edit] link next to the Payment Details. if you are eligible for Western Union Quick Cash then you will see an option there which looks like thisChina (Mainland)
Malaysia
Pakistan
Romania
Philippines
Argentina
Chile
Peru
Colombia

Please check out the Guidelines To Pickup Your WU Payment before you go and pick up your payment..(",)
Hi Malaysian, After you click [edit] you will be displayed the following screen. On this page, choose Setup WesternUnion Quick Cash option, as shown below. After that, wait until the end of the month and you will be given MTCN (Money Transfer Control Number). MTCN is a 10 digit number that you need to show when you are picking up your payment from CIMB Bank.Other than that, you also need to show your IC or Passport, and of course you need to know the exact amount of money you are withdrawing. Finally, you need to know Google Address. Again, you need to have these for picking up your payment: Google Address: Where to get your MTCN? Then click on the payment details. Make sure you click on the correct month: Then you will be displayed your payment details like this: Please be inform that your money will be available for 30 days in WU system. After which, if you do not withdraw it will be credited back to your Google AdSense account. 1. How much they charge for this? 2. Will the local bank charge anything? 3. Can you withdraw from any CIMB Branch?
I am very happy to hear about the announcement made by GA about a week ago. They have open to all malaysian adsense publisher and some other country to withdraw their money straight away from Western Union Bank. So now, you doesn't need to wait up to 1 month just to receive your check and another 1 month to clear it.
In Malaysia, Western Union currently available in CIMB Bank branches and in some Pos Malaysia branches.
Before you can get your payment via Western Union Quick Cash, you need to setup your payment option first. To do so, go to:
My Account > Account Settings > Payment Details [edit]
Google Inc.
1600 Amphitheatre Parkway
Mountain View, CA 94043
USA
In the beginning Google used to send it through email. But now it does not. So don’t wait for the email. Just make sure to login to your AdSense account at the end of the month. Go to My Account > Payments History page as shown below.


It’s FREE.
No, they won’t.
Yes you can, as long as you are inside the territory of Malaysia, you can withdraw from any branch of CIMB or Post Office (only some post offices have this, so please check).
As part of Google's efforts to make sure that the AdSense account details publishers provide are valid and correct, a couple types of validation that you may be aware of have been done: the Personal Identification Number (PIN) program and, in some locations, phone number verification. One or both of these verification methods is required in order to ensure the security and accuracy of your information so you can receive payments from AdSense.
Before this, Google would ask you to verify your information when your earnings reached $50. However, they have recently changed the threshold to $10. This lowered amount means many of you may see a PIN arrive in your mailbox soon, as well as a prompt in your account to verify your phone number. For more information about these holds, visit the links in the 'Required Actions' box on your Payment History page.
(Psst: If your all-time earnings are between $10 and $50, this might be a good time to learn all about PINs so you'll know what to expect. Or, if you prefer surprises, you can remain blissfully ignorant till a PIN mailer pops up in your mailbox. Just be sure you don't pitch it in the trash!)
Each publisher are required to enter a Personal Identification Number (PIN) in order to become eligible to receive payments from Google Adsense. PINs are printed on white 4.5 x 6 inch (11.4 x 15.2 cm) postcards and sent via standard mail after your account balance reaches US $10 for the first time. Since Google sent the PINs via standard mail, you need to have accurate contact information to help ensure that you can receive your payments. This is what does the PIN mailer look like.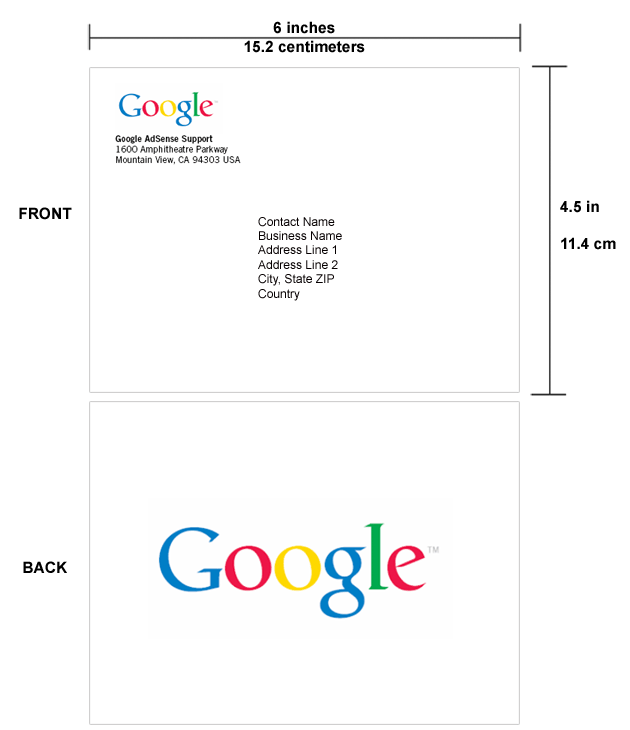
PINs typically arrive within 2-4 weeks, but may take longer depending on the location. You'll have 6 months from the initial issue date to enter your PIN. If you have not entered a PIN within 4 months, Google will replace the paid advertisements on your site with unpaid Public Service Ads. If you still have not entered your PIN within 6 months, your account will be disabled and your unpaid earnings will be refunded to the appropriate advertisers. If you do not receive your first PIN, you can have your request untill 2 more replacement PINs.
Today, I would like to share a very 'nice' strategy of increasing Google Adsense CTR which does involves images but does not involve in breaking of any Google Adsense TOS. It called " Innovative Google Ad Blending "
Before we go further, please take a look at both picture below:
Google Adsense Blending
Google CTR Boost
Instead of using 'real' image, I have put Google Referral scripts and no where in Google Adsense TOS have they said that you can’t place Google Adsense Ad Blocks near other Google Adsense Ads so this keeps me safe.
This strategy did increase my Google Adsense CTR dramatically. Besides it also gives you the chance to earn through referrals as it is considered a very difficult job unless you have high traffic.
How to implementing it in your Blog??
Here is how to implement this blending in your blog. If you want to implement your Google ads such that 3 Google Referral Ad blocks are shown beside it:
Just put this code
| {Firefox Referral Code} | {336×280 Google Adsense Block Code} |
| {Adsense Referral Code} | |
| {Adwords Referral Code} |
AdSense for Search is now powered by Custom Search. If you've used Custom Search Engine (CSE) before, you know that Custom Search offers advanced customization options to help improve the accuracy of your search results and tailor them to what users are looking for. With the integration of Custom Search into AdSense for search, you can take advantage of CSE's most popular features without having to leave your AdSense account.
Here are some of the new features:
Get start with the features above by visiting your AdSense Setup tab and selecting 'AdSense for Search' as your product. Once you've set up your search box, you may wish to explore more advanced features such as site exclusion, labels, and collaboration. Please note that these new features will only be available to you if you've migrated your account to a Google Account.
Ready to learn more about the new features available for AdSense for search? Just visit our Help Center or you can watch this youtube video prepared by Adsense Team below:
Recently, Google have introduced a new integrated Custom Search Engine into AdSense for search to provide additional customization options and improved targeting. Many blogger and webmaster out there have started to implement Custom Search Engine in their own blog and site. If you're just getting started with this feature, here are five optimization tips wrote by Adsense Team:
1. Place your search boxes in visible locations.
Integrate your search boxes in easy-to-find locations, such as under the header or in your left navigation. Also, keep the placement of your search boxes consistent on all your pages, so users will know where to look if they need help finding something.
Search box located at the top of the sidebar
image via: Travel in Kelantan
2. Add two search boxes to content-rich pages.
For pages with a lot of content or which require scrolling, try placing one search box at the top of the page and another at the bottom. A box at the top of the page will allow users to perform a search immediately, and a box at the bottom will provide a search option to users who've just finished reading your content. You can also track and compare the performance of each search box by creating custom channels.
3. Host your search results on your own site.
To keep users on your pages, you can host your search results and ads within your own pages. If your users don't find what they're looking for in the search results or ads, they'll still be able to to navigate to other sections of your site using your site's template. In addition, you can further integrate your search results into your site by customizing the colors of the results page.
Search result appear within site's pages
image via: Travel in Kelantan
4. Add a search box to your search results pages.
Similar to #3, try placing a search box on your search results pages so users can perform additional searches from your site.
5. Customize your ad locations.
Place ads at the top and right sidebar of your search results pages. This layout offers added visibility, and our tests have shown that these ad locations can improve monetization.
After you've optimized where search boxes are placed on your site, don't forget to try new targeting options such as keyword refinements and vertical search.
Being an AdSense publisher myself, accidental clicks were a real cause of worry for me. I’ve come across lots of publishers who lose their accounts due to this reason-TechBuzz
 What you need to do is install Firefox web browser with Greasemonkey extentesion.Then, download and install this script. Once the script being installed, visit your website that has Adsense Ads on it. The pop up box will come up and you need to enter your publisher ID and you are all set. I hope you know how to find your publisher ID.(You can find your publisher code at the bottom of ‘My Account’ in your AdSense Account’s Dashboard, it looks something like pub-xxxxxxxxxxxxxxxx).
Mika from DOSHDOSH come across with a useful tricks on howto get higher Click Through Rate ( CTR ). He found that using this idea, the ads definitely blend in better way with text and media since it remove the 'Advertise on this site' text ( refer to
screen shot ).


Many people believe having an adsense ads inside blog posts is a very good thing to improve the performance of the ads.
As we know, there are more chances for the ads to be clicked when they are in the middle(blog posts) rather than at the sidebars(especially the right sidebar),footer,etc.
Adsense ads between post
By doing this, the adsense units will be displayed between the blog posts in the homepage, archive pages and permalink (individual post pages).
Follow the step below to do this:
1. Sign in to your blogger dashboard>click on the layout link
2. Click on the Edit link in the "Blog Posts' column[look at the below screenshot]3. Check the box next to 'Show ads between Posts'4. Next,configure the ads,choose the format,colours,etc and SAVE THE CHANGES.That's it! Now your adsense ads will show between blog posts.
This is part 2 of HPK that i promise to give to you. There are all 15 keywords for today. Please check yours below:
Another 15 keywords for you.
mesothelioma lung cancer lung cancer lung cancer mesothelioma lung cancer lung cancer lung